Showing posts with label Things I Make. Show all posts

Thursday, October 21, 2010

Fall Decor


Ok, so I have been very slack with the blog posts lately.......things have been crazy busy around this household!! But today I wanted to show you some of my fall decor around the house!! I usually start putting up the fall decorations on the first day of fall (remember I said usually) and then I just add a few things for Halloween. That way it's easy to remove them and continue with the same fall decor through Thanksgiving;)


Pumpkins in the kitchen! You can purchase a pack of these for around a dollar at Micheal's!


Table decor: Ceramic pumpkins from the Dollar Store, Burlap I had left over: just cut a strip to make a great fall table runner.


Great hurricane from Willow House.....just add a bag of split peas & a pumpkin spice candle and you're done!!


Don't leave out the guest bathroom!! I just added a few of my left over pumpkins from Micheals, along with a few orange soaps:)


On the couch.....a throw pillow from Pier One in warm fall colors!!


Dollar Store Fall Leaf Wreath......Start out with a grapevine wreath, hot glue on Fall Leaves (I used 4 packs) & hang with ribbon!! Total cost: $5


And last but not least my favorite.......my front door!! The door bucket is from Willow House, I use the red & yellow flower arrangement in it from June until November!! I just add different things to it depending on the time of year (flags for the 4th of July & leaves and pumpkins for the fall....you get the idea) I only take the door bucket down 3 times during that time frame. For my DH's birthday (& put up my Birthday Balloon Wreath), Halloween (& put up a Halloween sign) and for Christmas (& put up a Christmas wreath)!! Then just add some mums and pumpkins (these are fake ones that light up and have the Jack-o-lantern faces on them) I simply turn them around and plug them up for Halloween and turn them back around for Thanksgiving!!


I HEART FALL


XOXO,

April

Monday, September 13, 2010

Baby Washcloth Lollipops

A friend of mine recently had a baby shower so I decided to put together a baby basket!! P.S. I LURVE making BASKETS!! One of the gifts was a pack of washcloths......But you know me I couldn't just throw the pack of washcloths in the basket...Oh No...I decided for SURE they had a calling to be made into lollipops instead!!
These are super easy and a cute way to dress up a basket or use as shower decorations!!

All you need:
washcloths, any kind of craft stick, cellophane, tape & ribbon!

Fold the washcloth in half & then into thirds

Start at one end and roll it up really tight and secure it with tape

Next I folded and rolled a second washcloth around the first! Now add your stick to the back & secure it with tape. Put some cellophane over it and tie a ribbon around it and your done!!
*I decided to use the pre made lollipop bags from Micheals for time reasons & a PLUS is they already come with ribbon.....but if you already have a roll of basket cellophane you could definitely just use that and cut out your own squares!


Cute little sweet treats that are sure to make anyone happy:)


XOXO,
April

Tuesday, August 31, 2010

Turn Lemons into Lemonade

Next time you go shopping PLEASE don't let the scratched up beyond repair.....marked WAY DOWN because no one wants them items SCARE you!!
EVERYTHING.....I repeat EVERYTHING can be fixed or used for something else!!
You can ALWAYS turn Lemons into Lemonade
Use your imagination as to how you could fix it or use it for something else & I promise you will SAVE a HUGE amount of $$$ in the process!!

Take my homemade chalkboard for instance.....I was on a misson to find a chalkboard for my dining room!! But there were some things that I wanted in this chalkboard.....1 it had to be BIG and 2 it had to have a chunky slightly formal frame!! I searched and searched with no luck!! And any that I found that I liked were anywhere from $50 to $100 bucks and that was NOT about to happen!!!

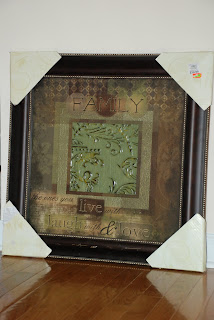
Until I found this at Kirklands:

Scratched up beyond belief......and on sale for ONLY $10!! (originally $40)
OH YEAH:)

This picture is not really my style, but I had to look past that.....1 it was BIG and 2 I LOVED the frame....oh yeah and I can't forget the price!!

That's all you need to make Lemonade!!

I started out by......you guessed it spray painting the frame white! But it turned out a little to white & I wanted the detailed edging of the frame to stand out. So I used a glaze (acrylic paint with a little water) Painted the glaze on & wiped it off with a rag!! Once that was dry I painted right over the glass with my next favorite thing....Chalkboard Paint!! (make sure you use the paint that can be used on glass & use a couple of coats)

And this is what I ended up with, it's perfect for my Dining Room:

I'm in LOVE!!

XOXO,

April

Thursday, August 19, 2010

Mason Jar Soap Dispenser

I'm sure some of you have seen something like this floating around the blogosphere!!
If not...I made one yesterday & I HAD to show you how to make your own:


Mason Jar Soap Dispenser


So my guest bathroom started off like this:

(The lighting is terrible in the guest bathroom and the lights for some reason make everything look pink!! EWWWW & Totally disregard the nasty mirror too.... I cleaned it after looking at these pictures)

A typical BORING Dial soap dispenser!! Not quite the look I was going for....but I'm CHEAP & I REFUSE to pay $10+ on a pretty one!! But I LOATH it.....
I really, really do!!


So I gathered up these supplies that I already had around the house:

  1. mason Jar
  2. wine bottle opener
  3. sand paper
  4. pliers
  5. soap w/ pump

Then I used the sandpaper to remove any writing on the lid....do this in small circles!(after this step you may want to seal the lid so it doesn't rust....I skipped this step because I'm ok with a little rust....I think it gives it more character)


Next punch a hole in the center with a wine bottle opener!


Make the hole larger by using your pliers to pull back the lid

(don't make the whole to big....you want your dispenser to fit tightly in the hole so it won't move around)

(I used the dispenser from my Dial soap:)

After that all you have to do is fill your Mason Jar up with soap and screw on the lid:)

XOXO,

April

Tuesday, August 17, 2010

Tissue Paper Pomander Ball

Recently I was asked how to make Tissue Paper Pomander Balls......so I'll show you step by step instructions on how to make your own!! They are great party decorations.....and cheap & easy to make!!

First get 10 pieces of tissue paper (rectangle one's work best, but I only had square one's & they were boring old white:(


Next fold it back and forth like you would if you were making a fan!

Then secure the middle with a pipe cleaner & cut the ends in a point or round shape


All you have to do now is fluff and hang with fishing line.....TA DA!!

A Tissue Paper Pomander Ball!!


XOXO,

April

Sunday, August 8, 2010

Birthday Balloon Wreath


Super Cute & Easy Birthday Balloon Wreath


I started out with a wire wreath I found at Micheals for $2.99 and about 8 bags of balloons from the Dollar Store:)


Start by tying the balloons in knots around the wire wreath!!
I did 2 layers.....one on the inside and one on the outside wire to make the wreath SUPER FULL!!


Believe me when I tell you that this is SO Easy........it took me one night & I did it while I was watching T.V.!!
There is NOTHING to SEW or GLUE!!
I'm not gonna lie....I was a little sad I didn't get to break out "Old Trusty" aka my glue gun!! But I think she deserved a much needed break!


How Cute is That?? Right:)


This would be awesome to hang on your door during the birthday's in your family or just for birthday party decor!!


Whole project cost around -$10


XOXO,
April

Friday, August 6, 2010

Dollar Store Hurricanes

{picture courtesy of Williams-Sonoma}

I am infatuated with these Williams-Sonoma hurricanes (correction...I am infatuated with almost everything in that store) and I'm not gonna lie, I was on the verge of purchasing TWO of them!! Can you really just have ONE?? NEGATIVE
Then while searching around on Blogland......I found the Thrifty Decor Chick's version and I must say I just want to kiss her little feet.....THANK YOU!!! I would have had to cut off my arm & my leg to get the ones from WS!! And now I get to keep my arm & leg and have two hurricanes!!
HIP HIP HOORAY........I LOVE when I get my way:)


I purchased these two candle stick holders & two glass cylinders at.......
THE DOLLAR STORE:) WHAT??


Break out the old trusty hot glue gun and glue those bad boys together!!


And this is the end results.....not exactly the same, but pretty darn close!!
Just to show what you can do with these and how big they are: I put a tall pillar candle in one & filled the other one with shells......the possibilities are endless!


I can't wait to decorate these for the Fall:)


Whole project cost - $4


XOXO,
April

Wednesday, July 28, 2010

Ribbon Organizer


If your like me.....you have tons of ribbon EVERYWHERE!! And clutter makes me CRAZY!! This project was started mainly because I could never find a thing I was looking for due to the fact that my office/craft room closet looks like Micheal's blew up in it!! (that's a whole different story that I can't get in to right now...it's making my blood pressure rise just thinking about it)

My revelation started when I saw something similar and decided I had to give it a try........and I must say I think it turned out to be pretty darn SPECTACULAR!!

This is all you need:

  1. pre-made shelf
  2. cafe style curtain rods
  3. (2) hooks
  4. (2) chains-same length
  5. drill

All you need to do is drill (2) small holes in your shelf so you can easily screw in the hooks.

**make sure your hooks are not to far apart!!

Next hang the shelf up on the wall and hang the chain from the 2 hooks. Put one end of cafe curtain rod through the chain and load on you ribbon!!

And your done!!


SERIOUSLY HOW EASY WAS THAT???


Whole project cost around-$20.00;)

XOXO,

April

Tuesday, July 6, 2010

Easy & Cheap Art


OK..........so I'm all about some easy & cheap ways to decorate my house!! I tend to change things in my house so much, I know if I buy decorations that are expensive they will one day (very soon) end up in a plastic bin, in my garage, in decoration heaven!! So my rule of thumb has always been.......Buy more expensive BIG pieces of furniture that you will keep for a long time & accessorize your house with inexpensive things.....so you won't feel so bad about getting rid of them when you want to change things up;)

So I started out with a $3 picture frame I found at Wally World and removed the glass!!


Then I took a fake pear I already had in a fruit bowl in the kitchen & cut it in half!!


Next all you need to do is hot glue the pear half onto the picture frame.........


And Wha La.......instant art for my kitchen & it only cost me $3 buck a roos!!
Which makes me insanely happy:)


XOXO,
April

Tuesday, April 27, 2010

Bow Flip Flops


I absolutely LOVE these girly flip flops....I saw some just like them @ a Boutique down the street and thought......I wanna give it a try:) The sides are wrapped with grosgrain ribbon and a handmade bow seals the deal on top!! Let me know what you think....I would love to hear feedback!!

To go to my Etsy store click here or email me for more details!!

XOXO,
April

Wednesday, March 3, 2010

Sugar & Spice and Everything Nice

So what do you do when you are waiting for your new niece Loralie {who is due any day now} to make her grand entrance??? What else.........You make her a super cute hot pink tutu!! For those of you who would like your chance to win one of these tutu's {you will be able to pick out the color & size} either for your own little sweet cheeks or for someone you know!! I will be giving one away next week on my blog......so keep checking back for more details.

{Pink Tulle makes me smile}


XOXO,

April

Thursday, February 4, 2010

A Cute Little Dog Bag


So here are some pictures of the cute dog bag project I've been working on. It's not done yet so I will post more pictures when it's complete! As most of you can tell by now, I can't stand to have nothing to do. So when I'm bored things like this begin to happen. I actually started this because I felt bad that our frenchie didn't have a bag of his own (I'm sure he knows that we've neglected to buy him a bag and is suffering from 2nd child syndrome....which would explain why he's so bad). But before we ever got our frenchie Dunkin, before I married my husband and moved to Florida, it was just me and my first love my boston terrier, Rocco. Rocco was SPOILED he had everything, including a bag with his name embroidered on it! Don't judge he needed that bag, for all of his belongings. Since then Dunkin has been forced to share Rocco's bag when we go on trips! So now, he will have one of his own and will always be on his best behavior:)*wink wink A girl can dream right??


Thursday, April 2, 2009

NEW,NEW,NEW


LITTLE DIVA'S FIRST SPOON

Just got finished with Little Diva's First Spoon! This is super cute and would make a great shower gift! Spoon is about 4inches in length, can be personalized with baby's first or last name initial bead, and can be done in any color!! The one pictured has soft pink glass beads and clear Swarovski Crystals!!Please email me with any questions:)